|
|
Post by taterjuice on Mar 12, 2015 2:10:38 GMT -5
Place tips here for gm w body cars
1st Gen 107.5 in wheelbase
1988–1996 Buick Regal
1988–1997 Oldsmobile Cutlass Supreme
1988–1996 Pontiac Grand Prix
1990–1994 Chevrolet Lumina
1.5 Gen 107.5 in wheelbase
1995–2001 Chevrolet Lumina
1995–1999 Chevrolet Monte Carlo
2nd Gen 109 in wheelbase
1997–2005 Buick Century
1997–2004 Buick Regal
1998–2002 Oldsmobile Intrigue
2nd Gen 110.5 in wheelbase
1997–2003 Pontiac Grand Prix
2000–2005 Chevrolet Impala
2000–2005 Chevrolet Monte Carlo
3rd gen 110.5 in wheelbase
2004–2008 Pontiac Grand Prix
2005–2009 Buick LaCrosse/Allure
2006–2016 Chevrolet Impala/Impala Limited[4][5]
2006–2007 Chevrolet Monte Carlo
|
|
|
|
Post by taterjuice on Mar 25, 2015 11:17:43 GMT -5
Here's what I know for sure right now I'll add more later:
Rebolt sub with all thread, delete rubber bushing.
Move coil pack to wiper/cowl area
If the computer is located under the hood, pull it in the car. You'll have to reroute and lengthen a few wires but after you do it once, it really pretty easy.
Use a resistor instead of the coolant temp sensor so you don't go into "limp" mode.
Hotwire trany so it'll stay in first gear.
|
|
|
|
Post by taterjuice on Mar 26, 2015 13:52:43 GMT -5
I'll do a more in depth on all the topics covered above and much more with pics soon. First up will be the trany Hotwire. Why Hotwire the trany you ask, otherwise it'll be stuck in 2nd and wouldnt out run a drunken turtle. Mainly this deals with 95 & ^ cars. One quick way of telling is the plugin located on the front of the trans. Only 4 wire square plug going in ? No need to Hotwire. If you have a 7 wire round plug, hot wiring applies to you. Here's a pic of the plug 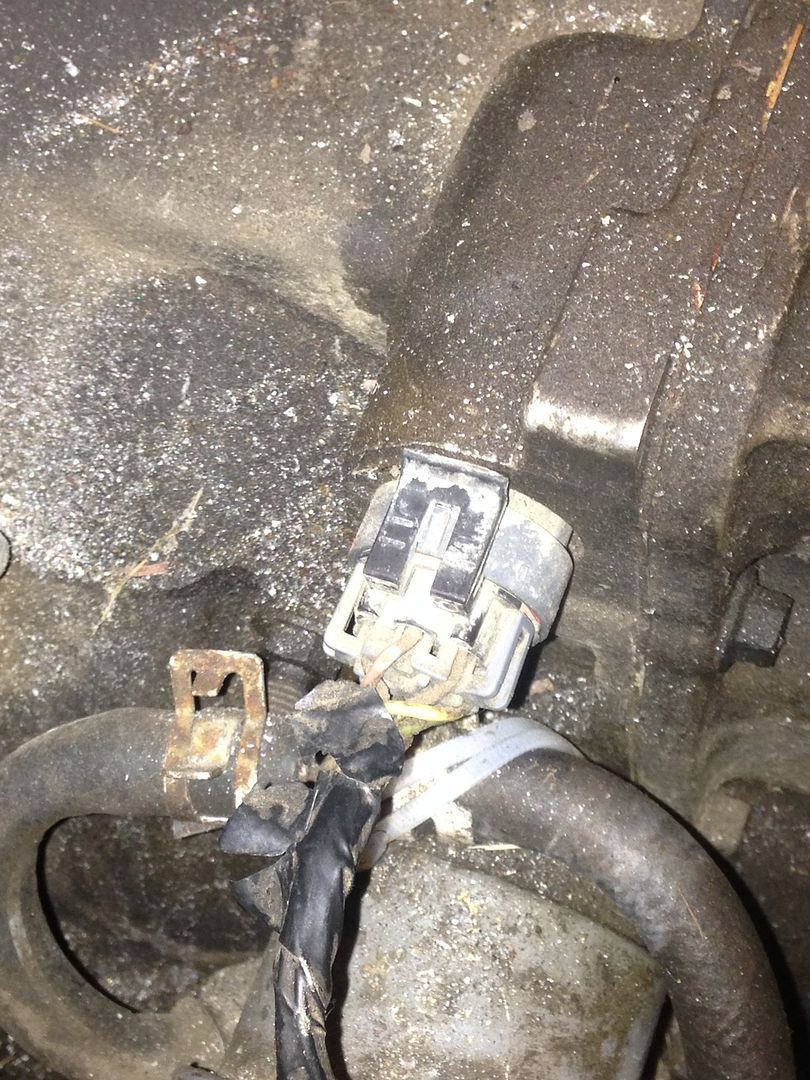 |
|
|
|
Post by taterjuice on Mar 28, 2015 8:35:03 GMT -5
|
|
|
|
Post by scooter24d on Mar 28, 2015 9:12:13 GMT -5
dang man you sure did get red of a rats nest nice work
|
|
|
|
Post by taterjuice on Mar 28, 2015 21:02:55 GMT -5
It's amazing what a good understanding of efi, scan tool, test light and some bud light can achieve.
|
|
|
|
Post by scooter24d on Mar 30, 2015 7:56:02 GMT -5
It's amazing what a good understanding of efi, scan tool, test light and some bud light can achieve. lol no kidding man i always thought if i ran one of these cars i would have it running and start cutting wires one by one |
|
|
|
Post by taterjuice on Apr 1, 2015 11:26:18 GMT -5
So I switched struts with an older square body w so I could fit 14" tires. What's the difference between the older struts and the bubble lumina struts ? Two things : bigger rotor and the tab that the caliper bracket bolts to is closer to the knuckle on the older struts. To fix it there are 2 options, change whole strut or cut and paste the tab off an older w and add the smaller rotor. Being mine had broke coil springs I opted to change the whole strut. Kept the calipers that were on the car so I didn't have to rebbleed the brakes. Anyhow here's how it looks with the new struts and my 14" skids on. 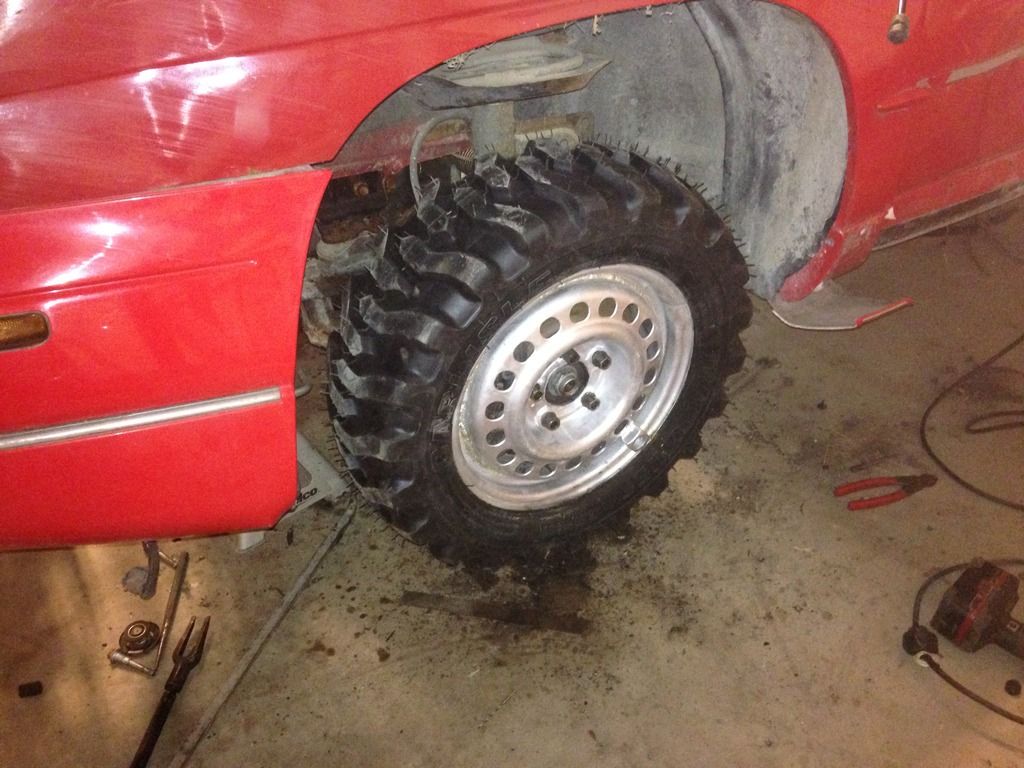 |
|
|
|
Post by scooter24d on Apr 6, 2015 18:34:25 GMT -5
those tires must grip with fwd looks good
|
|
|
|
Post by taterjuice on Apr 6, 2015 23:37:47 GMT -5
First year running em. Ran BFG tko 195/75r14 last year. Did good but I wanted to try the mini skids out. The BFG's will see action again on the century, mainly because they're already on a body rims.
|
|
|
|
Post by taterjuice on Jul 11, 2015 2:03:42 GMT -5
Tires got around great !! Broke a tie rod end and ended up on the berm tho.
|
|
|
|
Post by taterjuice on Jun 29, 2016 16:40:17 GMT -5
Here's how to weld a w body 4T60E Trans posi Here we go my write up on welding posi. Works the same on 4T60E or 4T65E. Pics taken with m/t pulled so if your m/t is still in the car you'll need to pull your strut and cv shaft. Locate extension cone, remove 4 bolts that retain housing, and 3 bolts in m/t brace, if that applies.  Remove cone, there are thrust bushings/bearings, whatever you call em, on both sides of the diffy. Keep track of which goes where.  Ok two options at this point, weld it how it is or remove c clip and completely remove from Trans. I recommend removal prior to welding. Weld it just like a regular diffy.  Might take a couple times to get it stabbed back in, once you do it a couple times pretty easy tho.  Make sure to cover both splined holes or it'll be a pita to get it back together. I made tabs out of sheet metal that fit tight in between pin and then holes to prevent splatter from getting in there. |
|


